
Want an easy dessert that screams festive but doesn’t require a culinary degree? I made this St. Patrick’s Day Brownie Trifle last year when I promised a “green” dessert and then realized I owned zero green baking skills. It turned out even my picky uncle asked for seconds, so yes—you can impress without stressing.
I’ll walk you through the star ingredient (spoiler: it’s the fudgy brownie), the quick build, and a couple of fun twists that make this trifle more than a pile of pretty layers. If you love layered desserts, you might also enjoy this caramel brownie cheesecake inspiration for another decadent idea.
By the end, you’ll have a no-fuss, crowd-pleasing dessert that looks fancy but tastes like a hug. Ready? Let’s go.
Why You’ll Love This Recipe
- Fast and forgiving: You assemble mostly — no delicate piping or tempering chocolate required.
- Crowd-friendly: People love layers; it feeds a crowd without bothering with individual plates.
- Versatile: Use store-bought brownies or homemade ones; both work great.
- Playful and festive: Add green sprinkles or mint for a St. Patrick’s Day vibe that actually tastes good.
- Make-ahead magic: Assemble ahead and chill — the flavors get better after a short rest.
Ingredients You’ll Need
Ingredient and Method: I keep the ingredient list simple so you can focus on assembly and presentation, not a million micro-steps.
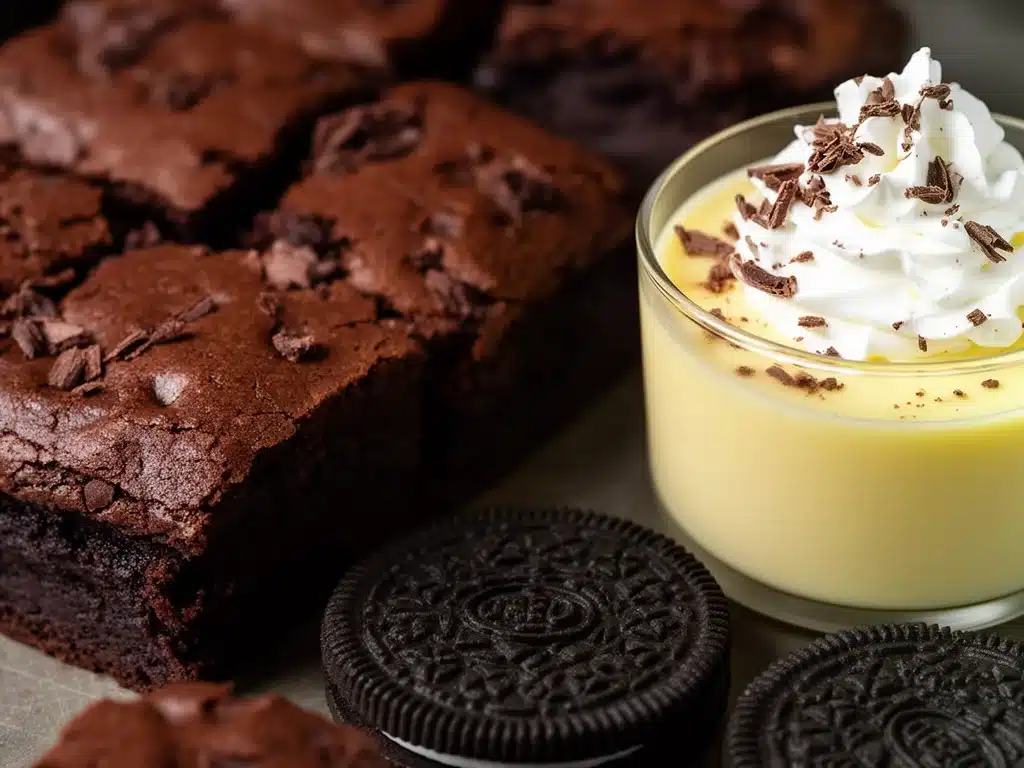
- Chocolate brownies (homemade or store-bought)
- Vanilla pudding (instant or homemade)
- Oreos (crushed)
- Whipped cream (for topping)
- Chocolate shavings (for garnish)
How to Make (Step-by-Step)
STEP 1
Prepare the chocolate brownies according to the package instructions and let them cool completely.
STEP 2
In a separate bowl, prepare the vanilla pudding as per package directions.
STEP 3
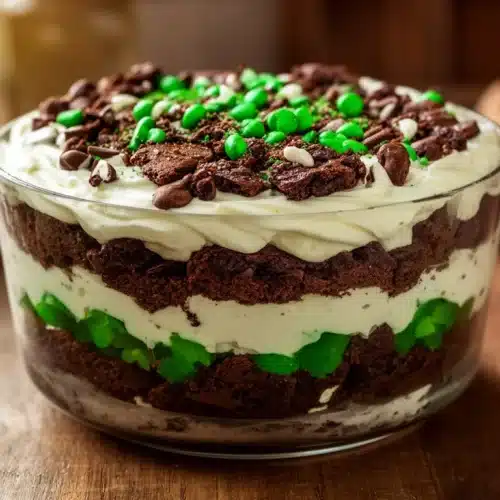
In a trifle dish or individual cups, layer crumbled brownies, a layer of vanilla pudding, and crushed Oreos.
STEP 4
Repeat the layers until all ingredients are used, finishing with a layer of whipped cream on top.
STEP 5
Garnish with chocolate shavings and additional Oreo crumbs if desired.
STEP 6
Refrigerate for at least an hour before serving. Enjoy your delicious no-bake dessert!
Pro Tips for the Best Results
- Cool the brownies completely before crumbling so the pudding doesn’t melt into a sad chocolate soup.
- Use chilled pudding for sharper layers; warm pudding blurs lines and makes a mess.
- Layer intentionally: bigger chunks of brownie give texture; finer crumbs hold together.
- Press layers lightly with the back of a spoon to eliminate air pockets and create cleaner slices.
- Add mint extract sparingly if you want a green-themed flavor — a few drops go a long way. FYI, don’t overdo it.
- For prettier edges, assemble in clear glass bowls or trifle dishes so the layers show off.
Fun Variations & Topping Ideas
Variations:
- Mint Brownie Trifle: Add a few drops of mint extract to the pudding and sprinkle crushed peppermint candies.
- Caramel Brownie Version: Drizzle salted caramel between layers for a sweet-salty twist.
- Irish Cream Version: Add a splash of Irish cream liqueur to the pudding or whipped cream for adults-only flair. IMO, keep it subtle.
Toppings:
- Green sprinkles or edible glitter for St. Patrick’s Day sparkle.
- Crumbled Oreos for crunch.
- Chocolate shavings or curls for an elegant finish.
- Fresh mint leaves for a pop of color and freshness. 🙂
Storing and Reheating
- Refrigeration: Cover the trifle with plastic wrap or an airtight lid and refrigerate for up to 3 days. The layers will soften over time, but it stays delicious.
- Freezing: I don’t recommend freezing the assembled trifle; whipped cream and pudding separate when frozen. If you must freeze, freeze brownie pieces separately and assemble after thawing.
- Reheating: Don’t try to microwave the whole trifle. If you want warm brownie bites, remove a portion, microwave for 10–15 seconds, then add a spoon of chilled pudding or whipped cream. Easy and safe.
Leftover ideas
- Brownie trifle parfaits: Spoon leftovers into jars for grab-and-go desserts.
- Milkshake remix: Blend leftover trifle with a scoop of vanilla ice cream for a boozy or non-boozy shake.
- Topping for ice cream: Spoon leftover layers over plain vanilla ice cream for instant indulgence.
- Cookie dough-style bites: Scoop leftovers into small balls, roll in crushed Oreos, chill, and treat as no-bake truffles.
Frequently Asked Questions (FAQ)
How long will this trifle keep in the fridge?
It stays good for up to 3 days when covered. After that it softens and the texture gets soggy. Eat sooner rather than later for best texture.
Can I use boxed pudding?
Yes — boxed instant pudding works great and saves time. For a richer texture, substitute half the milk with heavy cream when mixing the pudding.
Can I make it gluten-free?
Yes. Use gluten-free brownies and gluten-free cookies (Oreos have a gluten-free version in some regions). The pudding and whipped cream are usually gluten-free; check labels to be safe.
Can I make this ahead for a party?
Absolutely. Assemble several hours before your event and keep chilled. I recommend assembling no more than a day ahead if you want the best texture.
Can kids help assemble this?
Totally. Kids can crumble brownies, sprinkle Oreos, and add whipped cream. Just keep an eye on utensils and make a fun assembly station.
Conclusion
This St. Patrick’s Day Brownie Trifle gives you fudge-forward flavor, fun layers, and zero stress—perfect when you want a festive dessert that actually tastes as good as it looks. If you want to see another take on this layered dessert that inspired a few of my swaps, check out this St. Patrick’s Day Brownie Trifle version from a fellow baker: St. Patrick’s Day Brownie Trifle – The Cookin Chicks.
If you try this recipe, leave a comment and a rating — I genuinely love hearing which twist made someone’s family go “wow.” What will you add to your next trifle? Share your experiments below and tell me if your picky uncle approves.

St. Patrick’s Day Brownie Trifle
Ingredients
Dessert Layers
- 1 box Chocolate brownies (homemade or store-bought)
- 1 box Vanilla pudding (instant or homemade)
- 15 pieces Oreos (crushed)
- 2 cups Whipped cream (for topping)
- 1/2 cup Chocolate shavings (for garnish)
Instructions
Preparation
- Prepare the chocolate brownies according to the package instructions and let them cool completely.
- In a separate bowl, prepare the vanilla pudding as per package directions.
- In a trifle dish or individual cups, layer crumbled brownies, a layer of vanilla pudding, and crushed Oreos.
- Repeat the layers until all ingredients are used, finishing with a layer of whipped cream on top.
- Garnish with chocolate shavings and additional Oreo crumbs if desired.
- Refrigerate for at least an hour before serving. Enjoy your delicious no-bake dessert!