
Looking for a fun, protein-rich dessert that comes together with just two main ingredients? This Greek yogurt and jello recipe is the answer. It’s cool, creamy, and loaded with fruity flavor—perfect for a post-dinner treat or a midday snack. Whether you’re aiming to cut sugar, boost your protein intake, or just whip up something fun, this simple combo transforms everyday ingredients into something colorful and satisfying. From layered cups to mousse-like bowls, you’ll discover how to blend the tangy richness of Greek yogurt with the light sweetness of jello for a dessert that looks as good as it tastes.
Greek Yogurt and Jello Dessert
Ingredients
- 1 package flavored jello 3 oz
- 1 cup boiling water
- 1/2 cup cold water
- 1 cup Greek yogurt plain or vanilla
Instructions
- Dissolve the jello in boiling water, stirring until completely dissolved.
- Add cold water and let cool for 10–15 minutes until warm.
- Whisk in the Greek yogurt until smooth.
- Pour into serving dishes and refrigerate for 2 hours until set.
Notes
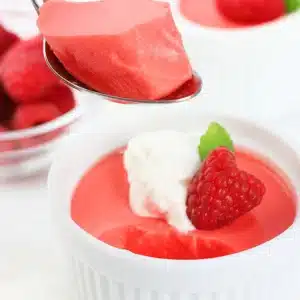
Top with fruit or granola just before serving for extra texture and flavor.
How I Fell in Love With This Greek Yogurt and Jello Recipe
A Dessert That Started With a Nudge From My Husband
This Greek yogurt and jello recipe has a little love story behind it. One warm spring afternoon, my husband (always the adventurous taste tester) challenged me to make a snack that was both refreshing and high in protein. I had Greek yogurt in the fridge, a box of strawberry jello in the pantry, and zero expectations. But as I mixed the two, something magical happened. The texture turned creamy yet light—like a mousse—but with way less effort. We sat down, spooned into it, and looked at each other with that “wait, this is really good” kind of look.
Why It’s Now a Staple in My Kitchen
Since that day, this Greek yogurt and jello recipe has been my go-to. It’s not just because it’s easy—though that’s a huge bonus. It’s because the tang of the yogurt balances perfectly with the fruity jello, and the texture feels indulgent without being heavy. I’ve made it with raspberry, lemon, even orange jello. Sometimes I add a dollop of whipped cream or layer it with fruit. It’s endlessly customizable and never disappoints.
When I’m not testing new dishes or browsing for healthy desserts, I come back to this one again and again. It’s quick, versatile, and—most importantly—my husband still asks for it by name.
What Makes Greek Yogurt and Jello So Good Together?
How Gelatin Transforms Greek Yogurt into a Creamy Dream
At first glance, Greek yogurt and jello might seem like an odd pair—but the magic happens thanks to gelatin. When jello is dissolved in hot water and allowed to cool slightly, it reaches a temperature just right for blending with Greek yogurt. The result? A creamy, spoonable dessert with a structure that holds without being rubbery. Because Greek yogurt is thicker and tangier than regular yogurt, it creates a balanced contrast with the sweetness of flavored gelatin.
This technique mirrors what traditional mousse recipes aim for—but skips the eggs and cream. As long as the yogurt is at room temperature before mixing, the blend comes together seamlessly. Just whisk gently until it’s uniform, pour it into cups or a dish, and chill. It sets into a light, jiggly treat that’s surprisingly high in protein and incredibly satisfying.
Popular Variations: Layered, Mousse-Style, and More
Once you’ve mastered the basic Greek yogurt and jello recipe, the fun begins. One popular method is layering: alternate fruit-flavored jello and yogurt-jello blends in clear cups to create eye-catching stripes. This is perfect for kids or party platters.
Another option gaining traction—especially among fitness fans—is protein mousse. By using sugar-free jello and high-protein Greek yogurt (like Icelandic or triple-strained), you can whip up a dessert with serious nutritional punch. For an airy texture, use an electric mixer and beat the mixture after it begins to set slightly—just until it’s light and fluffy.
Step-by-Step Guide to the Perfect Greek Yogurt and Jello Recipe
Simple Ingredients with Big Flavor
You don’t need much to create this creamy dessert, but the way you combine the ingredients makes all the difference. Here’s what you’ll need:
| Ingredient | Quantity |
|---|---|
| Flavored gelatin (e.g., strawberry, raspberry) | 1 package (3 oz) |
| Boiling water | 1 cup |
| Cold water | 1/2 cup |
| Greek yogurt (plain or vanilla) | 1 cup (room temperature) |
You can experiment with sugar-free gelatin or add a tablespoon of whipped cream for a richer finish. Flavored Greek yogurt also works—just reduce the jello’s intensity slightly.
How to Make It Step-by-Step
- In a mixing bowl, dissolve the jello powder in 1 cup of boiling water. Stir until completely clear—this step is key for smooth texture.
- Add 1/2 cup cold water and let the mixture cool slightly for 10–15 minutes.
- Once it’s warm (not hot), whisk in your Greek yogurt until the mixture is completely smooth. This avoids curdling and creates a silky blend.
- Pour into individual serving dishes or a large container.
- Refrigerate for at least 2 hours, or until fully set.
For added flair, garnish with sliced strawberries or raspberries just before serving. This method appears in several classic dessert recipes, and is especially handy for meal prep or summer potlucks.
Troubleshooting and Creative Serving Ideas
Avoiding Common Mistakes With Greek Yogurt and Jello
Even though this recipe is simple, a few small missteps can impact texture or flavor. One of the most common issues? Mixing hot gelatin with cold Greek yogurt too quickly. This can cause curdling or a lumpy texture. To avoid that, always let the gelatin cool to a warm (but still liquid) state before blending in the yogurt. Also, make sure your yogurt isn’t straight from the fridge—room temperature helps it incorporate smoothly.
Another pitfall is over-whipping. If you’re going for that whipped, mousse-like texture, don’t mix too long or you’ll lose the set. A hand mixer on low for 20–30 seconds once it starts to thicken usually does the trick. Some versions on social media over-mix until it’s foamy, but that can flatten the flavor and compromise structure.
Keep these tips in mind and your Greek yogurt and jello recipe will set beautifully every time.
How to Serve and Store This Versatile Treat
One of the best parts of this recipe? It’s incredibly flexible. Serve it in small clear glasses layered with fresh fruit for an elegant dessert. Or use it in lunchboxes as a protein-packed snack. For kids, pour the mixture into silicone molds or popsicle trays—it makes colorful, healthy frozen treats that look like candy but taste like creamy jello.
For a party platter, create rainbow layers using different jello flavors—just be sure each layer is set before adding the next.
As for storage, cover the containers tightly and refrigerate. The dessert keeps fresh for up to five days, making it a perfect option for meal prep. If you want to dress it up just before serving, add granola, a drizzle of honey, or a few mint leaves.
FAQs About Greek Yogurt and Jello
Can you mix Greek yogurt and jello?
Yes! It’s a delicious combination. Dissolve the gelatin in boiling water first, let it cool slightly, and then whisk in the Greek yogurt until smooth. Chill until set.
What happens if you add gelatin to Greek yogurt?
Adding gelatin creates a firmer, mousse-like texture. The gelatin sets as it cools, giving the yogurt structure while preserving its creamy quality.
Can I add gelatin to my yogurt?
Absolutely. You can use flavored or unflavored gelatin to thicken yogurt or turn it into a dessert. Just make sure both ingredients are at similar temperatures to mix evenly.
What can I mix Greek yogurt with?
Greek yogurt pairs well with fruits, granola, nuts, honey, protein powder—and, of course, gelatin. It’s great for smoothies, dips, desserts, and savory sauces.
Conclusion
There’s something seriously satisfying about turning a handful of ingredients into a dessert that’s creamy, colorful, and packed with protein. This Greek yogurt and jello recipe is quick enough for a weekday snack and pretty enough for a dinner party. Whether you layer it in parfaits, whip it into mousse, or cut it into fruity cubes, it’s the kind of dish that gets requested again and again.
If you’re just getting comfortable in the kitchen or looking to shake up your recipe routine, this is a go-to that never disappoints. Simple to make, easy to customize, and always a crowd-pleaser. Try it once—and if you love it, come share your results with me over on Facebook.