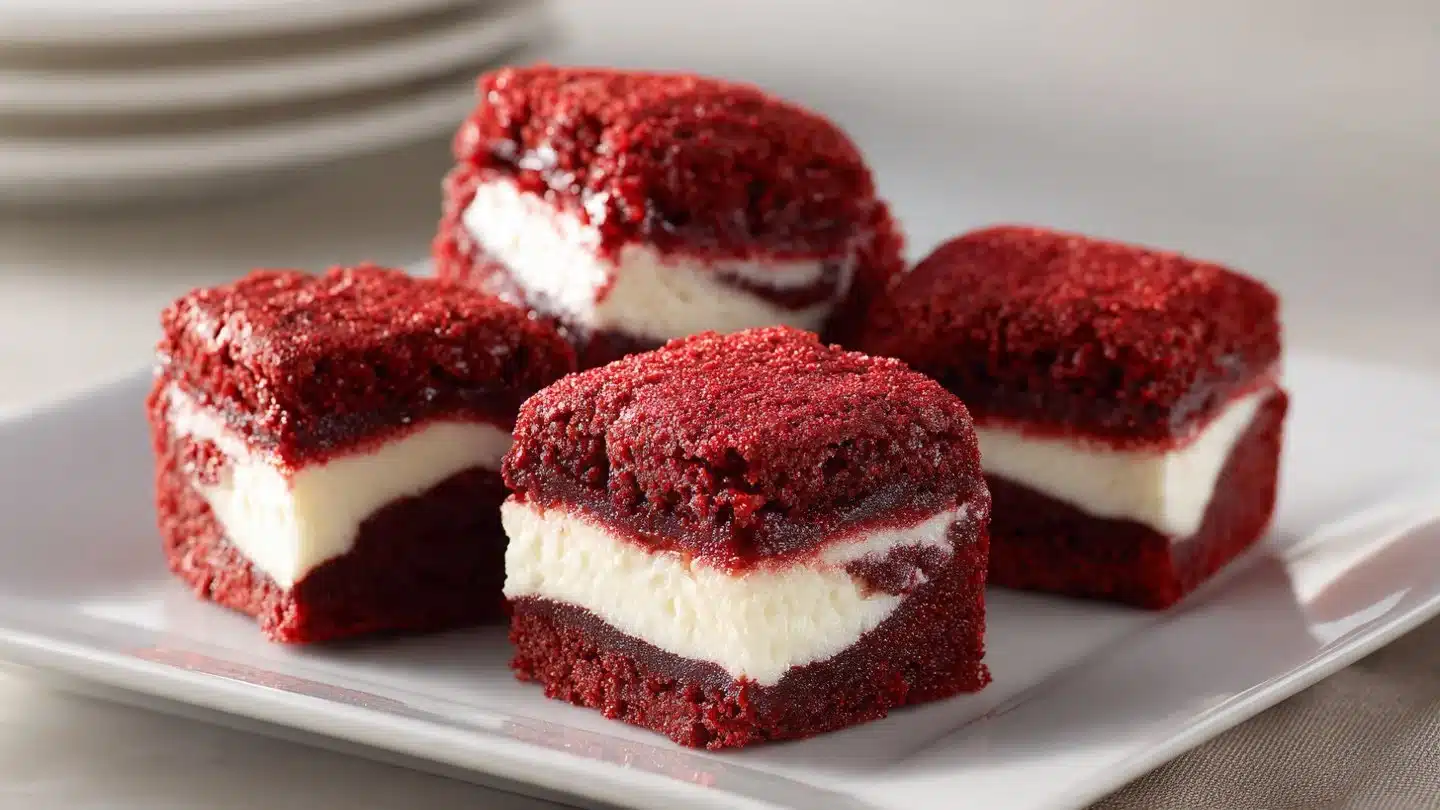
This Mini Red Velvet Brownie Bites recipe is fudgy, slightly tangy, and impossibly cute. It takes 30 minutes and serves 24.
The Story Behind
Ever baked something so tiny that you promised yourself “just one” and then ate, like, seven? Yeah, me too. I developed this Mini Red Velvet Brownie Bites recipe on a lazy Sunday when I wanted a chocolate fix but didn’t want a whole pan staring at me for the week. The star ingredient here is buttermilk — it gives those little bites that classic velvet tang and soft crumb that keeps people coming back for more.
In this post, I’ll walk you through everything: the why, the how, tweaks I swear by, and topping ideas that’ll make you look like you planned this for Instagram. If you love bite-sized desserts, also check out bite-sized red velvet cheesecakes for another fun twist.

5 Reasons You’ll Love This Recipe
- Crazy easy: You mix dry, mix wet, fold, and bake. No drama.
- Quick bake time: 12–15 minutes and you’ve got chocolatey happiness.
- Portable: Great for parties, lunchboxes, or sneaking into movie night.
- Customizable: Add cream cheese, nuts, or drizzle — your call.
- Perfect portion control: Tiny size, big satisfaction. Yes, you deserve it.
Ingredients You’ll Need
| Ingredient | Quantity | Notes with alternatives |
|---|---|---|
| All-purpose flour | 1 cup | Use gluten-free 1:1 blend if needed |
| Cocoa powder | 1/2 cup | Natural or Dutch-processed work; adjust baking soda if using Dutch |
| Sugar | 1 cup | Granulated; can use coconut sugar for a deeper flavor |
| Unsalted butter, melted | 1/2 cup | Or coconut oil for dairy-free |
| Large eggs | 2 | Use flax eggs to veganize |
| Buttermilk | 1/2 cup | Substitute: yogurt + milk or milk + 1 tsp vinegar |
| Red food coloring | 1 tablespoon | Gel gives richer color with less liquid |
| Vanilla extract | 1 teaspoon | Use fresh for best aroma |
| Baking soda | 1/2 teaspoon | Helps lift; don’t skip |
| Salt | 1/4 teaspoon | Balances sweetness |
How to Make (Step-by-Step)
Ingredient: See the table above for everything you need.
Method: Follow the steps below for perfect mini brownies.
STEP 1
Preheat your oven to 350°F (175°C) and grease a mini muffin tin.
STEP 2
In a large bowl, whisk together the flour, cocoa powder, sugar, baking soda, and salt.
STEP 3
In another bowl, combine the melted butter, eggs, buttermilk, food coloring, and vanilla until well mixed.
STEP 4
Gradually fold the wet ingredients into the dry ingredients until combined.
STEP 5
Pour the batter into the mini muffin tin, filling each cup about 2/3 full.
STEP 6
Bake for 12–15 minutes or until a toothpick inserted comes out clean.
STEP 7
Let them cool before removing from the tin. Enjoy your fudgy brownie bites!
Pro Tips for the Best Results
- Measure flour properly: Spoon into the cup and level it for accurate texture.
- Use gel food coloring: You get vivid color without extra liquid.
- Don’t overmix: Fold until just combined — overmixing makes them cakier.
- Watch the bake time: Start checking at 11 minutes; they go from perfect to dry fast.
- Cool fully before frosting: Warm bites melt cream cheese into a mess, unless that’s your vibe.
Fun Variations & Topping Ideas
Variations:
- Cheesecake swirl: Drop small dollops of sweetened cream cheese on top and swirl before baking. Instant fancy.
- Nutty upgrade: Mix chopped pecans or walnuts into the batter for crunch.
- Vegan twist: Use flax eggs, coconut oil, and plant-based milk + vinegar instead of buttermilk.
- Double chocolate: Fold in mini chocolate chips for pockets of melty goodness.
Toppings:
- Classic cream cheese frosting: Beat cream cheese + butter + powdered sugar + vanilla.
- Powdered sugar dusting: Simple and elegant.
- White chocolate drizzle: Melt and drizzle for contrast.
- Sprinkles or edible glitter: Because celebration.
Storing and Reheating
Storing:
- Room temp: Store in an airtight container for up to 2 days.
- Refrigerator: Keep frosted bites in the fridge for up to 5 days.
- Freezing: Freeze unfrosted bites on a tray, then transfer to a bag for up to 2 months.
Reheating:
- Microwave: 8–10 seconds — they warm quickly, so watch them.
- Oven: 5–7 minutes at 300°F (150°C) for a more even reheating.
- Thawing: Let frozen bites thaw in the fridge overnight before reheating.
Leftover ideas
- Crumb topping: Crumble leftover bites over ice cream or yogurt.
- Milk dunkers: Warm one and dunk it into coffee or milk — trust me.
- Parfait layers: Layer crumbled bites with whipped cream and berries.
- Truffle remix: Blitz leftovers with cream, roll into balls, and coat with cocoa or sprinkles.
Frequently Asked Questions (FAQ)
Can I make these ahead of time?
Yes. I prepare batter and refrigerate it for up to 24 hours. Spoon straight into the tin when ready to bake.
Can I use less food coloring?
You can. Use less for a softer hue, or swap in beet powder for natural color — IMO it gives a subtle earthier flavor.
Are these gluten-free friendly?
You can use a 1:1 gluten-free flour blend. Texture might vary slightly, but they still come out tasty.
How do I stop the bites from sticking?
Grease the tin well or use mini liners. Let the bites cool completely; they release easier when not piping hot.
Can I make them bigger?
Sure, use a standard muffin tin and increase bake time to about 18–22 minutes, checking for doneness.
Conclusion:
These Mini Red Velvet Brownie Bites deliver fudgy texture, a pleasant tang from buttermilk, and a party-ready look with minimal effort. They work for weeknight cravings, dessert tables, and last-minute gifts. If you enjoyed this recipe, you might like the inspiration behind a cheesecake-brownie mashup; check out Red Velvet Cheesecake Brownie Bites – Just a Taste for a tasty variation.
Leave a comment and a rating below — I read every single one and love hearing your twists. Also, tell me: will you eat one or seven? (No judgment here.)

Mini Red Velvet Brownie Bites
Ingredients
Dry Ingredients
- 1 cup All-purpose flour Use gluten-free 1:1 blend if needed
- 1/2 cup Cocoa powder Natural or Dutch-processed work; adjust baking soda if using Dutch
- 1 cup Sugar Granulated; can use coconut sugar for a deeper flavor
- 1/2 teaspoon Baking soda Helps lift; don’t skip
- 1/4 teaspoon Salt Balances sweetness
Wet Ingredients
- 1/2 cup Unsalted butter, melted Or coconut oil for dairy-free
- 2 pieces Large eggs Use flax eggs to veganize
- 1/2 cup Buttermilk Substitute: yogurt + milk or milk + 1 tsp vinegar
- 1 tablespoon Red food coloring Gel gives richer color with less liquid
- 1 teaspoon Vanilla extract Use fresh for best aroma
Instructions
Preparation
- Preheat your oven to 350°F (175°C) and grease a mini muffin tin.
- In a large bowl, whisk together the flour, cocoa powder, sugar, baking soda, and salt.
- In another bowl, combine the melted butter, eggs, buttermilk, food coloring, and vanilla until well mixed.
- Gradually fold the wet ingredients into the dry ingredients until combined.
- Pour the batter into the mini muffin tin, filling each cup about 2/3 full.
Baking
- Bake for 12–15 minutes or until a toothpick inserted comes out clean.
- Let them cool before removing from the tin. Enjoy your fudgy brownie bites!
Notes

Mini Red Velvet Brownie Bites
Ingredients
Dry Ingredients
- 1 cup All-purpose flour Use gluten-free 1:1 blend if needed
- 1/2 cup Cocoa powder Natural or Dutch-processed work; adjust baking soda if using Dutch
- 1 cup Sugar Granulated; can use coconut sugar for a deeper flavor
- 1/2 teaspoon Baking soda Helps lift; don’t skip
- 1/4 teaspoon Salt Balances sweetness
Wet Ingredients
- 1/2 cup Unsalted butter, melted Or coconut oil for dairy-free
- 2 pieces Large eggs Use flax eggs to veganize
- 1/2 cup Buttermilk Substitute: yogurt + milk or milk + 1 tsp vinegar
- 1 tablespoon Red food coloring Gel gives richer color with less liquid
- 1 teaspoon Vanilla extract Use fresh for best aroma
Instructions
Preparation
- Preheat your oven to 350°F (175°C) and grease a mini muffin tin.
- In a large bowl, whisk together the flour, cocoa powder, sugar, baking soda, and salt.
- In another bowl, combine the melted butter, eggs, buttermilk, food coloring, and vanilla until well mixed.
- Gradually fold the wet ingredients into the dry ingredients until combined.
- Pour the batter into the mini muffin tin, filling each cup about 2/3 full.
Baking
- Bake for 12–15 minutes or until a toothpick inserted comes out clean.
- Let them cool before removing from the tin. Enjoy your fudgy brownie bites!